Sunday, February 23, 2014

Beading: The Creepy and the Downright Odd

Beading:  The Creepy and the Odd
People’s tastes vary in the extreme when it comes to creative jewelry making.  In my case, I don’t want to put time into a project that I wouldn’t want to wear, even if I’m making it for someone else.  As I was thumbing through beading books and online artist galleries this week, I came across many designs I didn’t exactly love, but these pieces seemed particularly uncanny!


1.        I see you…and you, and you, and you!  This oddball eyeball necklace comes from Lucy Chalmers and is called “Lucy’s Pearls.”  Makes you kinda wonder who this Lucy person is and who had the misfortune of last laying eyes upon her.  Yes, stupid pun intended.


2.        Betsy Youngquist’s collection of eye necklace pendants seemed a little disturbing also, until I found her other works.  Do yourself a favor and Google her work.  Your morbid curiosity will thank you.


3.        Wow.  Just…no.  Why?


4.       Many designs are inspired by nature, but this one's a little seedy.  Get it?  Seedy?  Seed bead snake?  Nevermind.  Anyway,  Patty Haberman’s “Theif Necklace and Brooch” crosses the boundaries of extended metaphor and symbolism in all the wrong ways.  What would the Freud say?

You have to admit though, the idea of a necklace connecting to a brooch was clever!


5.       There’s a fine line between mysterious and downright creepy.   This necklace by Margie Deeb, called “Veil,” throws off the shackles of the enigmatic to embrace…well I’m not sure what… oppression of women by the Taliban? The sheik’s conquering of his favorite new concubine? Middle Eastern human trafficking?  Yikes! 


6.        If you’ve ever seen The Princess Bride, this necklace may conjure up an image of the albino in Count Ruben’s torture chamber.  It’s like they’re twins.  In the words of Westley, “Dear God, what is that thing?”  I was a little relieved when I read Jennifer Vanbenschoten’s comment on her necklace that she calls “Lady in the Lake”:

"When I created Lady in the Lake, I was more concerned with telling my story articistically instead of making a necklace that could be worn every day" (BeadingDaily.com).


But then I began to think about it a little more.  So by making something you wouldn’t wear every day, does that mean she’s saving it just for special occasions?  Like creepy séances or pillaging the local cemetery at a midnight meeting of Satan worshippers?    And what the heck kind of a story brings this kind of inspiration…forgetting to take your Risperdal when picking out the focal piece?  Ooh girl, hit the Kaiser pharmacy with a quickness!


7.        When I first saw this I was taken aback, much like the Aztecs when Hernan Cortez rode up onto the scene.  Are we supposed to worship this bird-god or sing along with it?  Evidently, the spread double talon is the inspiration for Felieke Van Der Leest’s “Peace Parrot.”   I'm guessing it's a pendant???

Speaking of peace, or pee anyway, Van Der Leest has many unique beaded creations, such as this one:


8.       To give the artist the benefit of the doubt, maybe my interpretation is wrong.  Because if that really is a golden stream, what on earth is happening in the back??  Whatever it is, the horse looks as surprised as I am.
Feast your eyes on more of his, eh…unique creations here:  http://klimt02.net/jewellers/felieke-leest


9.       This is Dixie Gabric’s “Do You Really Know Me?”  While I do admire the concept of hiding behind a mask created solely for public acceptance,  maybe I would have chosen something a little less reminiscent of a puss-filled, yeasty eye infection.  Ew.


10.    Wow, look at those spikes!  Can you believe women used to sleep in these things?  

So here's my question:  is this a comparison of the agony of the crucifixion to the pains of fitting into society’s notions of beauty?  Nah.  Juan Riusech de Haro probably just ran out of beads and was suddenly inspired by (desperate to find supplies) his wife’s stash of pink curlers.  This lovely crown of thorns also doubles as a necklace.  Goody.  
(Be a pro and read Goody sarcastically while knowing it's also a brand of hair accessories.  Yes, I know, my puns and allusions need professional help.)


 Bonus:  “The Monkey King” brooch by Jeannie Bench.  While I’m not exactly sure what message the artist is giving with this piece, I do know I’d feel a little weird wearing this partially disembodied simian-man out in public.   Maybe like Jacob Marley in “A Christmas Carol,” he’s a spirit of admonition:  “I say, children, heed the doctor’s warning:  No more monkeys jumping on the bed!”


 Well, that's it!  Stay tuned for a less snarky look at unusual jewelry pieces!


Sunday, February 16, 2014

Jewelry Making Must Have of the Week

Like most people embarking on a new hobby, I have shamefully wasted too much money.  Buying the wrong tools or solutions flushes your bead money right down the tubes!  So frustrating!  When I first caught the beading bug, blogging had just become a trend, yet I couldn’t always find good advice on what I really needed to purchase and what I could do without.  These are the must haves of the craft!


I found this gem (no pun intended, for reals) at Tuesday morning.  Just the day before, I had been ogling it at Hobby Lobby.  Luckily I didn’t buy it then, because I saved $10 by picking it up at the discount store.

My new favorite is this portable bead mat.  I’ve seen some bulky ones with bead boards, but this one proved slim & streamlined for my busy life.  I love the pockets on the sides for my tools and supplies.  When I fold it up, my project keeps pretty safe and sound.  Love this thing!

Next week I’ll show some great, affordable storage solutions and how to get the best price.  I’ve tried several systems, but these are the ones that save me a lot of time in finding what I need quickly without frustration. 


Friday, December 13, 2013

DIY Clasps

Whether you are looking to save money, match a unique pattern, or add your own sense of flair, making your own clasps is a cinch.    Doing a little research on the technique that works for you can take you from Oh, you made it yourself to Wow, you made that?

Here are some pics from that net that I'm tempted to try:

Cool Copper Celtic Clasp

Circulet Clasp with Dangling Bead

Beaded Wire Clasp


Bead-Centered Clasp

Gorgeous Front Clasp
For tutorials, try these sites:  


 Wire Workers Guild Clasp Tutes
 Golden Gate Clasp Tutorial
Beaded S Clasp


Bonus!  A Clever DIY Tool for Fastening Your Bracelet.

Sunday, December 1, 2013

Easy Crystal Bracelet Tutorial

Left:  Blue crystals, rows of three 6 mm alternated colors.
Right:  rows of three 4 mm, with four rows of 4-6-4 mm crystals in the middle.

Skinny bracelet: Single crystal rows (8mm).


One of the first types of bracelets I learned to make is this simple crystal bracelet.  If you love sparkle and want something that works up quickly and easily, this is a great way to practice beading while giving yourself or a loved one a gorgeous gift.

You don't have to use crystals. In fact, any beads you like will do.  I just happen to love the sparkle of Swarovski crystals.


What you'll need:

  • Wire Cutters
  • Round Nose Pliers
  • Crimper


  • 11/0 seed beads (about 220 of them, or one small package)--I used size 11 cylinder beads instead.
  • Crystals (about 60 6 mm or so for a wider bracelet or 20 8 mm for a smaller one)
  • A clasp (I usually use a two-strand clasp)
  • Beading wire
  • 4 crimp beads


1.  Start by affixing your two strands of wire to the clasp with crimp beads.  Basically, you insert the wires into the clasp holes.  String on a crimp bead for each strand.  Fold the tail of the wires with a little excess (about a centimeter or so) and tuck them into their respective crimp beads.  Use your crimpers to squeeze the crimp bead closed.


2.  Next, string 6 seed beads onto each wire.

3.  Pick up your crystal(s) with one wire.  Then go through the crystal(s) in the opposite direction (criss-crossed) with the other wire.  Pull snug, but not too tight.


4.  Repeat until you have the desired length (usually this will be 20 rows of crystals with the 6 seed bead columns on either end).  Avoid help from eager children and mischievous cats.


5.  When you have your desired length, add the crimp beads and insert the wires into the clasp.


6.  Trim the wires, slip them from the back of the clasp into the crimp bead and several of the seed beads.  Crimp and then you're done!

Tips:  
Be careful about the length you use when crimping around the clasp.  Too tight and it will be too stiff.  Too loose and it won't look right.

As you work, pause after each row to make sure your tension is adequate (not too tight, not too loose).

Always cut a longer strand of wire than you think you need.  It's better to have extra than to run out!


Jewelry Dress Form

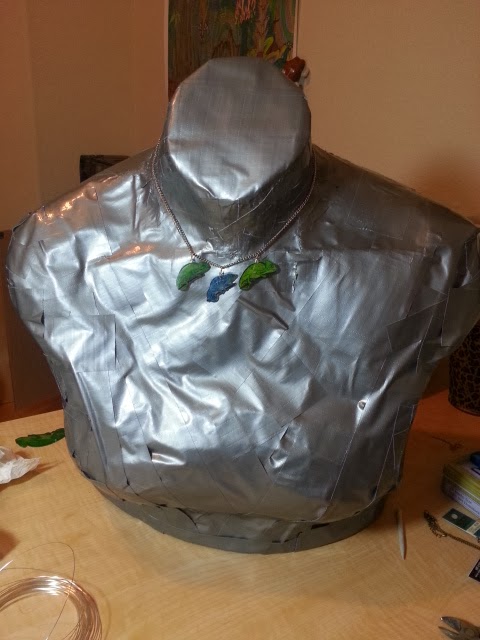
For some time now, I've wanted something that would help me perfect my necklace-making.   I've yelled, "I can't believe that just happened!" so many times that my kids and husband roll their eyes at my now-ironic statement.  I guess I should believe it because half the time I hold up a strung design to my neck and chest (trying to figure out how long I want it), one half of the wire slips out of my grasp and beads cascade all over the floor.  I even tried using Bead Buddies to keep the ends secure and it still spilled all over the place!!!  Hopeless?  Nope!
Jenny II:  My sister-in-law's form.

In the absence of a mannequin, I decided to make my own necklace form.  Luckily, my sister-in-law just moved up and happens to have similar dimensions!  After watching a Youtube on how to make a dress form, off I went to her place with a bunch of duct tape, an old shirt, and my enthusiasm.  An hour later I was cutting the form off her and sealing it up.
Using the dress form to see how my chameleon charms hang.

Here's what I learned:

1.  Pinning up hair isn't good enough.  Spray water, detangler, or better yet, hairspray.  Baby hairs love duct tape.  OUCH!

2.  Cut the duct tape into smaller pieces for around the neck.  That much curve is hard to handle.  I even cut it in half length-wise.

3.   For bumps, use a curling iron.  Just run it hot over the tape (preferably with a thin cotton tee between the iron & tape). Of course, wait until you get it off the model's body first.

4.  Because you've used many layers of duct tape, now the form is going to be larger than the actual model.  I now need to cut it apart again and reduce the size.

Sunday, June 9, 2013

Learning to Create Digital Art

Bamboo CaptureOf course this is a jewelry making blog, but what better way to design custom looks than to draw out the specs?  So after a few glasses of really scrumptious syrrah, my wallet escorted me to Amazon where I foolishly, but excitedly, ordered a graphics tablet.  I chose the Create from Wacom's Bamboo line and two days later it arrived!


So I guess this summer will be spent learning to use the new tablet.  I will say if you're used to pen and paper, it's a little tricky to switch to a new medium like this, but not impossible.  Hopefully in the next six weeks, thanks to awesome Youtube vloggers, I'll see some progression in my skills (or lack thereof)!

My first doodle:
Mushroom Guy

Why a mushroom?  Well, I tried to draw a face and it was so bad it looked like a mushroom character to me.  Oh well, at least I was able to practice using Autodesk Sketchbook Express, which came with the drawing tablet.

Saturday, January 5, 2013

Waited so Long! Faceted Glass Briolette Necklace with 6/0 seed beads

I bought these beads a few years ago for pennies on the dollar.  It was one of those awesome sales I can't resist even though I really try to follow this advice to prevent overspending:

Buy ONLY what you need for the project at hand.

Sometimes you just have to jump on a good deal, though.  As I was goofing around with a cool Pinterest crochet lace tutorial, I tried these amethyst colored glass briolettes and realized they might not be best for the project.

BUT, and this is where craft fails turn into craft successes, I loved the way they looked with alternating pairs of 6/0 seed beads.  I loved that the necklace reminded me of the classic Swarovski collar necklaces from the 1950's.

It's simple and repetitive, but elegant, I think.

The only problem with waiting so long to use them is that I don't know whether these are crystal or just plain glass.  I'm guessing glass.  Either way, the faceting adds a bit of sparkle in the light.