Come see my new Etsy shop! Right now you can get 20% off any purchase over 15% with coupon code PHILANTHROPIST. You can feel good for supporting a local artist and a college student!
View jewelry-making media, such as polymer clay, beading, wire wrapping, and a combination of fun techniques!
Saturday, August 22, 2015
Thursday, December 4, 2014
What to Do When You Run Out of Beads!
So you stocked up on some awesome beads you found on sale, yet you still don't have enough for your project. It's a frustrating scenario that happens too often. Luckily, there are ways to get around it besides turning your necklace project into a bracelet project instead.
Not only will it help you build a nice necklace that requires fewer beads, but using chain will also lay very nicely with your design. Plus, when your curb chain is thinner in diameter than your beads, you'll actually achieve a more lengthened look for your neckline. Since my Thanksgiving pounds have added up, I relish this thinning idea!
In my project, I realized I hadn't purchased enough of this bead blend. Luckily, I had some gun-metal colored chain, complete with findings. I simply added 3 inches of chain on either side of each strand and voila! It turned out looking nice and professional. Add this to my new blue blouse and I have a gorgeous ensemble for tomorrow's work day!
Not only will it help you build a nice necklace that requires fewer beads, but using chain will also lay very nicely with your design. Plus, when your curb chain is thinner in diameter than your beads, you'll actually achieve a more lengthened look for your neckline. Since my Thanksgiving pounds have added up, I relish this thinning idea!
In my project, I realized I hadn't purchased enough of this bead blend. Luckily, I had some gun-metal colored chain, complete with findings. I simply added 3 inches of chain on either side of each strand and voila! It turned out looking nice and professional. Add this to my new blue blouse and I have a gorgeous ensemble for tomorrow's work day!
Wednesday, November 26, 2014
Amazing Hawaiian Cork Board
I've been wanting a cork board for a long time, but they are so plain and bland. I finally decided I had to bite the bullet because I really need one in my craft room. So after Googling cool boards, I decided to try a technique with scrapbook paper. My daughter came with me to Hobby Lobby and helped me pick out the colors.
We were looking for a design that would look good with my hanging ukuleles and the vintage Hawaiian travel posters I just ordered. Josie even reminded me of a cool way to turn buttons or scrapbook brads into tacks for our project. We picked up the paper, tacks, buttons, and washi tape, ready to add to the craft room!
Here's what we bought:
We were looking for a design that would look good with my hanging ukuleles and the vintage Hawaiian travel posters I just ordered. Josie even reminded me of a cool way to turn buttons or scrapbook brads into tacks for our project. We picked up the paper, tacks, buttons, and washi tape, ready to add to the craft room!
Here's what we bought:
We trimmed the paper and hot glued the buttons to the tacks (after cutting off the shanks). I love what we have now!
Monday, November 10, 2014
Never throw away toilet paper rolls!
After my last project making color pencil organizers, I contemplated the importance of collecting rolls from toilet paper and paper towels. Yep, I'm a crafter. And as any crafter knows, you may not need it now, but in the long term, you'll be sorry if you toss out the *trash*!
With 3 various junk drawers filled with tangled cords and god only knows what else, having a place where I can find a charger without a 30 minute search is such a relief! So where does one find such a thing?
I did what any craft whore would do: I jumped on Pinterest. There were a range of solutions, most of which involved going to the hobby store. Normally I'm all for it, but having felt under the weather all day, I needed something I could find around the house. And sure enough, some clever connoisseur of craftiliciousness had developed just the remedy I sought!
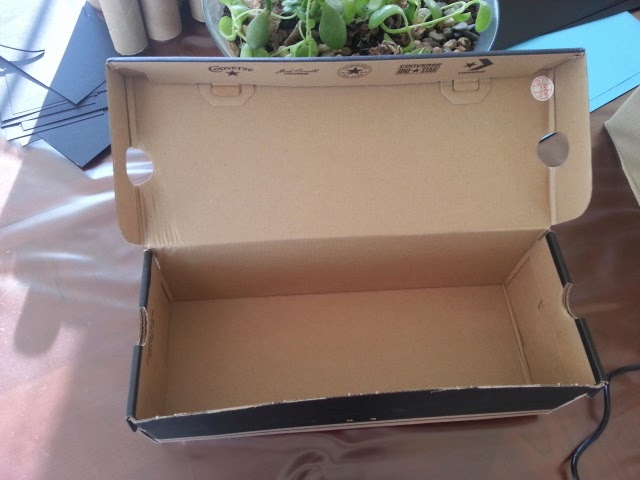
Armed with a shoebox, black scrapbooking paper (my kitchen appliances are all black), and toilet paper rolls, I jumped right in.
Tip: use regular tape on the outside of the toilet paper rolls and fold the top over like you might with giftwrap. In fact, a lovely wrapping paper would have been a much easier and decorative alternative.
Voila:
Tip #2: when you fold up cords, make sure to put them in so the tip is showing. This way you know what the cord is supposed to charge!
With 3 various junk drawers filled with tangled cords and god only knows what else, having a place where I can find a charger without a 30 minute search is such a relief! So where does one find such a thing?
I did what any craft whore would do: I jumped on Pinterest. There were a range of solutions, most of which involved going to the hobby store. Normally I'm all for it, but having felt under the weather all day, I needed something I could find around the house. And sure enough, some clever connoisseur of craftiliciousness had developed just the remedy I sought!
Armed with a shoebox, black scrapbooking paper (my kitchen appliances are all black), and toilet paper rolls, I jumped right in.
Tip: use regular tape on the outside of the toilet paper rolls and fold the top over like you might with giftwrap. In fact, a lovely wrapping paper would have been a much easier and decorative alternative.
Voila:
Tip #2: when you fold up cords, make sure to put them in so the tip is showing. This way you know what the cord is supposed to charge!
Friday, October 17, 2014
FREE Jewelry Class at Michaels this Coming Tuesday
Each month we offer a free jewelry making class at Michaels geared toward beginners. Come join me at the Brentwood Michaels this Tuesday (October 21) to learn to make a necklace and matching earrings! Sign up at the front or online at www.michaels.com.
With the skills you learn you can make several styles of necklaces, earrings and bracelets. Make your Christmas gifts and save big bucks!
If you don't love the tassels, you can make the necklace without it and I will show you how to make crystal and pearl earrings.
With the skills you learn you can make several styles of necklaces, earrings and bracelets. Make your Christmas gifts and save big bucks!
If you don't love the tassels, you can make the necklace without it and I will show you how to make crystal and pearl earrings.
Wednesday, October 15, 2014
Keep Your Coloring In Line
I love crayons, color pencils, markers, paints, and pastels. I am still traumatized by the image of my baby brother when I received a brand new box of Crayola color markers at the start of third grade from my great-grandmother. I had carefully placed my unopened markers in the room we shared. Later that evening, he came toddling out, streams of red, blue, and green dripping from his saliva-covered chin. I was not just horrified; I was absolutely INDIGNANT!!! To an 8-year-old child of a fiscally-challenged single parent, this was sibling treason!!!
I have to come clean about my art & office supply fetish. I may be a hot, sloppy mess in reality, but I fantasize about perfectly organized new materials, available at a moment's touch. My daughter, who follows after my obscene compulsion for colorful and tidy objects, encouraged me to check out organizers available on Amazon. What I found was either insufficient for all my coupon-collected colors or well outside a teacher's budget!
So like any Pinterest addict, I did what I had to do. I went online and researched. I added hundreds of pins (because it's like shopping for FREE). I dug through all the trash cans and recycle in my house to find paper towel and toilet paper rolls for my project. In my passion I distinctly remember my husband saying, "Jesus, Erin, please make sure when you blog about this you don't tell people I don't give you any money ! I just gave you $500 this month!" (BTW, I spent it on craft room furniture and supplies, no surprise!)
But now my beautifully grouped color pencils are now at rest in their new homes!
I have to come clean about my art & office supply fetish. I may be a hot, sloppy mess in reality, but I fantasize about perfectly organized new materials, available at a moment's touch. My daughter, who follows after my obscene compulsion for colorful and tidy objects, encouraged me to check out organizers available on Amazon. What I found was either insufficient for all my coupon-collected colors or well outside a teacher's budget!
![]() |
| Wow! |
![]() |
| When are these going on sale so I can use my Michael's employee discount? |
![]() |
| Gorgeous! |
![]() |
| Not enough color pencil slots! |
So like any Pinterest addict, I did what I had to do. I went online and researched. I added hundreds of pins (because it's like shopping for FREE). I dug through all the trash cans and recycle in my house to find paper towel and toilet paper rolls for my project. In my passion I distinctly remember my husband saying, "Jesus, Erin, please make sure when you blog about this you don't tell people I don't give you any money ! I just gave you $500 this month!" (BTW, I spent it on craft room furniture and supplies, no surprise!)
But now my beautifully grouped color pencils are now at rest in their new homes!
Caveat: I didn't make this one. My organizer is a messy comic book decoupage, but I stole this one because it's prettier. Thanks to this awesome crafty mom at https://thepartyevent.wordpress.com/2013/05/
Monday, October 13, 2014
Six Tips for Securing a Clasp on Your Necklace or Bracelet
Over time I've made enough mistakes to discover how NOT to add a clasp to my jewelry. When you first add your crimp beads to your jewelry wire, it's a cinch! But when you get to the end, it gets complicated. I used to sweat every time I had to finish a piece. Now I feel much more confident!
Tip 1: Use the Proper PliersI improvised this weird way of trying to bend wire into shape using round-nose pliers. It was a disaster. One day I realized it wasn't just my technique that made finishing a piece so sketchy. It was the pliers! I switched to regular long-nose pliers and it's gotten instantly easier! Hook nose also work great. Both are shown in this photo.
Tip 2: Give Just a Little Wiggle Room
If you are like me, you have strong tension. This makes for very tight bead weaving and stringing. Loosen up for Pete's sake! When you get to the end and put your crimp beads on the wire, give yourself a little space between the crimp bead and the clasp. Make sure you can move the wire a little around the clasp so that it doesn't lock up when it's worn.
Tip 3: Watch that Wiggle Room!
![]() |
Before you crimp, make sure you don't have any major gaps in your work. There's nothing more irritating than having to take apart your project and restring it because you failed to detect the extra wire or thread in some area of your work. On the other hand, you want to make sure the necklace or bracelet doesn't bunch up. Before crimping the clasp on, bend it into the shape in which it will be worn. Remember that saying, measure twice, cut once!Tip 4: Double Crimp
Many people who come to me for repairs do so because of a failed crimp bead. Having your project fall to pieces as you wear just stinks, especially when you've just told someone your one-of-a-kind necklace is your artisan creation (synonym for homemade). Add two crimp beads to each end to keep it secure.
Tip 5: Know Your Clasp!
Obviously you need the right clasp for your work. A magnet clasp might not support the weight of your necklace. Some clasps tarnish when worn. Your clasp should be sturdy and the right size as well as strand accommodation for your project. I've recently begun using a sealant on certain clasps that I know will turn color from use.Tip 6: Close a Locking Clasp First
Certain types of clasps lock into place. For this reason, it's possible to put one end of the clasp on backwards, especially if you are in a rush or perhaps just tired from a long day at work. I recommend putting the clasp together right before attaching the wire or thread. This way you are sure to attach it correctly. It is so frustrating to discover only too late that half the clasp is backwards. From this point you usually have to restring the entire project! Yikes!
I hope these tips are useful for you! Feel free to hit Follow or Subs
cribe!
Subscribe to:
Posts (Atom)