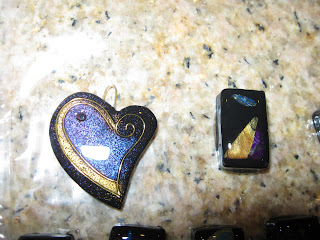
Leafing through a library book on beading, I was inspired by some polymer clay beads and decided to make my own rendition. It took quite some time, but I'm very happy with the outcome so far!
The first challenge was to find a way to cut the clay. I had hand-shaped the rectangles and was not happy with the lumpy, less-than-uniform tablets. Then I remembered one of the greatest polyclay tips I've learned so far: use corn starch on a mold for an easy release. Lucky for me, this also works ingeniously with cutters! I had thought the cutters I bought were useless to me because the clay stuck in them and would not release without becomming mishapen.

Next I began experimenting with color mixes, like blending a cobalt blue with gold and making jellyroll with transparent and purple. I wasn't sure I liked half of what I made, but I figured what the heck? Why not just see what happens?
After baking, I sanded these suckers as if I were trying to oblitertate them one layer at a time, from 150 up to 1500. BTW, for those looking, you can get the finer grit at automotive stores. It took at least a month for me to locate them. Thank God for blogs, which is where I learned this information.

The last step was to use Eugena Topina's recipe for success: Envirotex Lite High Gloss Finish. This resin is gold in the polyclay world. Topina is an amazing artist. In fact, the heart in the pictures is a first-run attempt I produced after purchasing one of her excellent tutorials. I was very proud that it came out so gorgeous. Her tutorials are well worth the price as they detail everything. If I had to figure all that out on my own, well, I wouldn't have. Plus, I learned several techniques and discovered a few products I had never known existed up until then. I can't wait to string these suckers onto a bracelet or choker!
