Thursday, July 14, 2011

Faux precious stones with polymer clay

One of my new favorites books is Making Polymer Clay Beads. It features several solid techniques and how to turn clay into faux gem stones. Here is the result of my malachite cane:


I used a mica shift (also explained in the book and very easy) to create the gold in the square pendants. The swirly gold in the rectangular pendant was rolled from hand-made snakes of both black and gold. The other rectangular pendant is simply stamped. Each are pre-drilled.


To get the rounded triangle shape, I used a bendable blade.


These will be fun to turn into necklaces!!! Up next: Faux jade? Wire? Who knows!

Saturday, June 25, 2011

Swarovski crystal bracelet versus highly faceted bead bracelet


The backgrounds in the pics aren't great, but the sparkle from these great bracelets will nearly blind you when you step out on a sunny day! I love how they catch the light and the prisms they throw when the sun passes through them!


Thursday, June 23, 2011

Plastastic Pets!


Like every other owner on the planet, I think my pets are the cutest! So I took a picture of my pocket puppy, traced it on shrink plastic, colored it in, and now I can wear her image everywhere I go!


For whatever reason, the blogspot editor refuses to add this pic the right way.


Shrink plastic hummingbird pendant


It's just a shrink art kind of summer! In reliving the Shrinky Dink fun of childhood, my daughter and I have been creating all sorts of pendants and charms!


To the left is my 11-year-old daughter's sea horse that she traced from an image on the web and colored in with bright Prang color pencils.


Here is a free-hand drawing. It turned out a little darker than I wanted, so I'll probably redo it.


Medusa's head is a fun pendant, but I will likley replace the cheap black cord with a more colorful stringing of beads.


My son saw this Mortal Kombat dragon and wanted a pendant of silver and red. I think if I did it again, I would make the dragon black with silver highlighting.


Shrink plastic necklace with fire-polished Czech glass


The necklace uses wire wrapping as well as crimped stringing wire to combine shrink plastic flowers with Czech glass. Again, it's a very time-consuming project, but it has a little bit of vintage flair and made a great gift for my Mom's birthday!


Before sticking them in the oven, the flowers were about 2 1/4 inches across. Here are the flowers before shrinking:


Afterward, they were about 1". Notice the comparison with the quarter in each picture. Also, notice that the flowers become a little darker and more concentrated in color.


Plastic Necklace of mini Hello Kitty Charms


Who doesn't love Hello Kitty? I constructed this necklace by tracing over Hello Kitty images and coloring them in. Then I used a thin-gauge wire to wire-wrap the charms about 1" apart. It was very time-consuming, but what a fun result! I wear this with a lot of casual clothes and plan to make a matching bracelet, too!


Saturday, April 30, 2011

Circular Peyote Stitch Bangle

Japanese 8/0 cylinders showcase clear seed beads and swarovski pearls. This free pattern by Anna Elizabeth Draeger (Beadandbutton.com) claims the bangle is quick and easy. I have limited experience with peyote stitch, but I have to admit, it was exactly as claimed and fun to wear!


I only wish I had enough to make a few more bracelets because they would be fun to wear stacked!

Friday, April 29, 2011

Mosaic Polymer Clay Bracelet

I finally finished the mosaic bracelet. It's a mosaic technique with polymer clay. Pink Swarovski are wire wrapped to link each medallion.


I used chain that can attach to the lobster clasp so that the bracelet is adjustable.


Thursday, April 28, 2011

Mosaic Multimedia Polymer Clay Bracelet


In exchange for a marvelous gift, Polymer Clay Mixed Media Jewelry, I promised to make my friend the bracelet on the cover. I had visited this book often in Michaels, but because coupons are not valid on books, I had to make due with leafing through its pages when I visited.


It took me longer than it probably should have to create a functional Skinner blend, but once that part was done, the rest was easy. It took many hours to create the mixed media pieces and I enjoyed watching Youtube during the more tedious portions. Finally, I cured the little medalions and they are ready to link up with some Swarovskis!


Here is a closeup of one of the medium-sized medallions. My camera afforded me few other useable closeup shots. I love how the hot fix crystals show up against the bright orange and pink mosaic clay. They are also framed in by cylinder and seed beads.


I didn't like the way the artist put another layer of clay for the sides and backing. It just looked clunky. Instead, I used metallic powders and painted the sides and back. I was considering silver leaf, but since I've never used the stuff, I chickened out!


Another change: I didn't use jumprings as links. I tried them before and they only mishaped the clay piece I was working on, which was infuriating! Here I trimmed the long end off eye pins and inserted them as deep as I dare go. I'm proud of nearly all of them! The middle one was my first try and it ended up looking whacked out, so I'll be redoing that one. Not bad, all in all for my first try at this project!


Three Classic Necklaces


These three necklaces were very easy to put together.

This first necklace uses luminous hand-crafted glass I purchased from an artist in Moro Bay. When worn, the glass appears to take on green and purple hues, reflecting light beautifully. It looks very elegant and I love how the beads stand out against skin tones. Because I wanted them to be the focal point of the necklace, I chose a very fine gold chain and medium-sized gold beads to allow the glass beads to stand out. It's just too bad my camera does not show the brilliance of the beads.


This necklace design comes from Sandra Halpenny, who features her designs on her web site for purchase. This was one of the freebies. Using light blue seed beads and crystal Swarovskis, I altered the pattern only slightly by adding the 4mm crystals that hang lowest. This was a snap to make, even for a beginner!


I love the vintage look of this necklace. I used two types of gold chain, using the wire-wrapped lilac glass to combine them. If I had it to do over, I would use a different type of base chain that would be more accomodating for the hanging briolettes. For such an inexpensive and easy necklace, it lends a classic elegance to most any outfit. This was my first attempt at this type of wirewrapping, and although it could be a little smoother, I was pleased at the forgiving quality of the 24-gauge wire.


Wednesday, March 23, 2011

Amazing beads


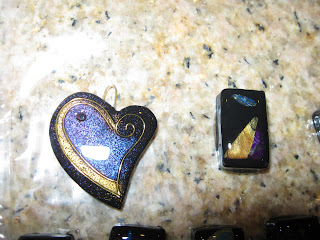
Leafing through a library book on beading, I was inspired by some polymer clay beads and decided to make my own rendition. It took quite some time, but I'm very happy with the outcome so far!


The first challenge was to find a way to cut the clay. I had hand-shaped the rectangles and was not happy with the lumpy, less-than-uniform tablets. Then I remembered one of the greatest polyclay tips I've learned so far: use corn starch on a mold for an easy release. Lucky for me, this also works ingeniously with cutters! I had thought the cutters I bought were useless to me because the clay stuck in them and would not release without becomming mishapen.


Next I began experimenting with color mixes, like blending a cobalt blue with gold and making jellyroll with transparent and purple. I wasn't sure I liked half of what I made, but I figured what the heck? Why not just see what happens?


After baking, I sanded these suckers as if I were trying to oblitertate them one layer at a time, from 150 up to 1500. BTW, for those looking, you can get the finer grit at automotive stores. It took at least a month for me to locate them. Thank God for blogs, which is where I learned this information.


The last step was to use Eugena Topina's recipe for success: Envirotex Lite High Gloss Finish. This resin is gold in the polyclay world. Topina is an amazing artist. In fact, the heart in the pictures is a first-run attempt I produced after purchasing one of her excellent tutorials. I was very proud that it came out so gorgeous. Her tutorials are well worth the price as they detail everything. If I had to figure all that out on my own, well, I wouldn't have. Plus, I learned several techniques and discovered a few products I had never known existed up until then. I can't wait to string these suckers onto a bracelet or choker!

Sunday, March 6, 2011

Rockin' free bracelet pattern


One great way to get free patterns is to try out beadandbutton.com. I recently put together bracelet that has the versatility of allowing for the use of cubes or 6/0 seed beads. The result is a kick-ass bracelet that I can wear with a number of outfits. Even better, the pattern consists of instructions for a toggle and loop so that extra findings are unecessary and the closure matches perfectly. One alteration I made was to leave off the embellishment and weave through the bracelet to provide it with more security. The effect was just what I.

Monday, February 21, 2011

Easy to Make, Easy to Break

Last weekend I tried to put together this bracelet from a free Bead&Button pattern by Wendy Hunt. The pattern actually illustrates steps for making a necklace, but since both time and capital were not extensive, it was easier to modify the pattern into a bracelet.


It turned out great! And then quickly it fell apart. Several times. This might be due to my shoddy knot-tying skills, but I remade it again and again and will hope it doesn't fall apart on my sister-in-law, whose birthday I had made it to grace. Ironically, I had been worried about the large jumprings causing me problems because my stitching usually holds up very well, knots be damned. I'll just have to see as time goes on whether it's a design to last.


I love the way the diamond shapes are linked together by 5mm jumprings holding an extra two seed beads for decoration. Since the 6mm I bought didn't work out, I used 10mm and just added an extra two seed beads. All in all, the bracelet took less than $10 to make since I already had a needle, clasps and plenty of Fireline.


Tips of the week:

1. Don't let frustrations work you up while beading. Needles are very sharp.

2. Try out beadandbutton.com for some great free patterns.